Zero-Lag NDI Streaming: Send OBS Video from Linux Host to Windows VM Over Host-Only Network

Introduction
If you’re streaming or recording from a Linux machine (like Kubuntu) using OBS Studio, but want to offload encoding, effects, or streaming to a Windows setup—all while keeping latency ultra-low—you don’t need WiFi, capture cards, or expensive hardware.
Enter NDI® (Network Device Interface) combined with a VirtualBox host-only network. This setup creates a private, wired-like connection between your Linux host and Windows virtual machine. Video travels over a dedicated virtual Ethernet link with typically 30ms or less latency, full quality, and no interference from your home network or neighbors.
It’s secure, isolated, and blazing fast—perfect for multi-PC streaming workflows. Bonus: your CPU load drops because the heavy lifting can move to the VM. Setup takes about 10-15 minutes.
Understanding the Setup
- VirtualBox Host-Only Network: This creates a private virtual network adapter on your host (Linux) and connects it directly to the VM (Windows). No internet access, no external traffic—just pure point-to-point communication between host and guest. By default, it uses the 192.168.56.0/24 subnet.
- NDI: A low-latency IP video protocol from Vizrt (formerly NewTek). With the DistroAV plugin (the current NDI integration for OBS), you can output your OBS program feed from Linux and receive it instantly in Windows OBS as a source.
- Why no WiFi? WiFi introduces variable latency, packet loss, and bandwidth sharing. A host-only network is essentially a direct cable—stable, gigabit-speed (limited only by your hardware), and zero external interference.
This works great for gaming streams (capture on Linux host, encode/stream from powerful Windows VM) or complex productions.
Prerequisites:
- VirtualBox installed on your Linux host.
- OBS Studio on both Linux host and Windows VM.
- DistroAV (NDI plugin) installed on both (latest version supports OBS 31+ and NDI 6+).
Implementation: Step-by-Step Guide
1. Create the Host-Only Network on Linux Host
Open VirtualBox → File → Tools → Host Network Manager (or Preferences → Network on older versions).
- Click the + icon to create a new host-only network.
- Name it something like “obs-wire”.
- In Adapter tab: IPv4 Address: 192.168.56.1, Mask: 255.255.255.0.
- Disable DHCP server (we’ll use static IPs for simplicity and reliability).
- Apply and close.
To bring the interface up (if needed):
sudo ip addr add 192.168.56.1/24 dev vboxnetX  # Replace X with the number (e.g., vboxnet0)
sudo ip link set vboxnetX up
(You can find the interface name in Host Network Manager.)
2. Configure the Windows VM Network
- Shut down the Windows VM if running.
- In VirtualBox VM Settings → Network → Enable Adapter 2 (or any free adapter).
- Attached to: Host-only Adapter.
- Name: Select your new network (e.g., “obs-wire”).
- Start the VM.
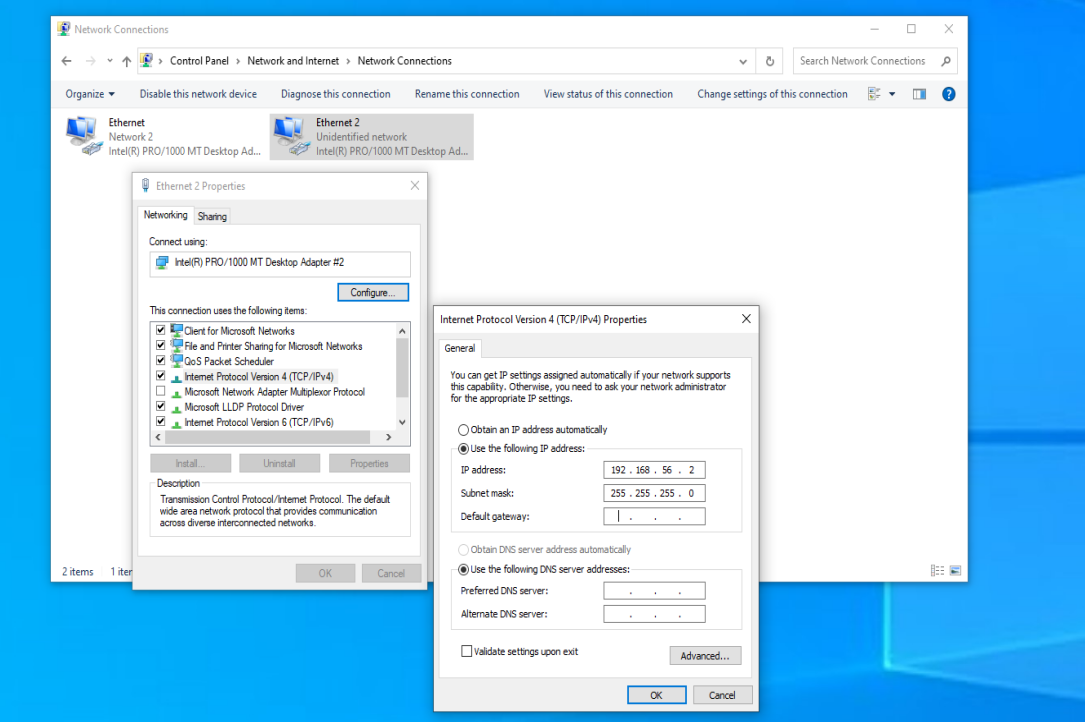
Inside Windows:
- Open Network & Sharing Center → Change adapter settings.
- Right-click the new VirtualBox adapter → Properties → Internet Protocol Version 4 (TCP/IPv4) → Properties.
- Set manually:
- IP address: 192.168.56.2
- Subnet mask: 255.255.255.0
- Gateway and DNS: Leave blank.
- OK and close.
Test connectivity: From Windows CMD, ping 192.168.56.1. From Linux terminal, ping 192.168.56.2.
3. Enable NDI Output on Linux OBS (Host)
- In OBS Studio → Tools → DistroAV Output Settings (or NDI® Output Settings).
- Check Enable Main Output.
- Set a name, e.g., “lionheart-feed”.
- Leave other settings default (it uses multicast discovery by default, which works fine on this small network).
- Apply.
Your program feed is now broadcasting over NDI.
4. Add NDI Source in Windows OBS (VM)
- In OBS Studio → Sources → + → NDI® Source.
- Select your feed (e.g., “lionheart-feed” from the host machine name).
- Boom—ultra-low latency video appears.
Expect 30ms or less delay, buttery smooth even with audio (dogs barking included). Monitor CPU usage—you’ll likely see a nice drop on the host.
Isolating NDI Traffic in OBS to a VirtualBox Host-Only Network
When running OBS with NDI between a Linux host and a Windows guest VM in VirtualBox, you might notice that NDI sources from your main Network / WiFi still appear in the guest — even when using a dedicated host-only network (vboxnet0).
This happens because the DistroAV (NDI) plugin in OBS binds to all interfaces (0.0.0.0) and sends multicast discovery packets out on every available network interface, regardless of the “Bind to IP” setting in OBS Advanced → Network (which only affects RTMP streaming, not NDI).
A clean and effective workaround is to block NDI multicast traffic on your Network / WiFi interface using iptables. This forces all NDI communication to stay on the VirtualBox host-only network (vboxnet0) while keeping your Network/WiFi fully functional for internet access and everything else.
The Solution: Block Outgoing NDI Multicast on Network / WiFi Run this single command on your Linux host:
sudo iptables -I OUTPUT -o wlp0s20f3 -d 224.0.0.0/4 -j DROP
Replace wlp0s20f3 with your actual WiFi interface name (check with ip link). Use ip addr to list your networks
What it does:
- Drops all outgoing packets destined for the multicast address range (224.0.0.0 – 239.255.255.255) on your Network / WiFi interface.
- NDI discovery and stream announcements from your Linux OBS can no longer escape onto the broader Network LAN.
- Traffic on vboxnet0 (and loopback) remains completely unaffected — your Windows VM continues to see and connect to the NDI sources perfectly.
Troubleshooting Tips:
- If the source doesn’t appear: Ensure firewall allows NDI traffic (usually UDP ports 5353, 5960+). Temporarily disable firewalls.
- Check IPs: In Windows CMD,
netsh interface ipv4 show addresses. - Restart OBS on both sides.
Further Reading
- Official VirtualBox Manual – Chapter 6: Virtual Networking: https://www.virtualbox.org/manual/ch06.html#network_hostonly
- DistroAV (NDI Plugin for OBS) GitHub & Installation Wiki: https://github.com/DistroAV/DistroAV
- NDI Official Site & Tools/Downloads: https://ndi.video/
- OBS Project Forums – DistroAV Thread: https://obsproject.com/forum/resources/distroav-network-audio-video-in-obs-studio-using-ndi-technology.528/
This setup turns your Linux host + Windows VM into a pro-grade, lag-free production pipeline. No more Network / WiFi excuses—go wired (virtually) and watch your streams shine!