php develop and debug setup installing eclipse virtualbox xdebug

Summary
Despite searching google and YouTube, I had been unable to find a good solid setup that provides a full workflow, with debugging and virtualised development server. This tutorial assumes that you’re running Kubuntu Linux, if not you can fix that by downloading it free from kubuntu.org This Tutorial / How To we will go through setting up an Ubuntu Server run a LAMP ( Linux, Apache, MySQL, PHP ) development stack, configured to run in debug mode. We’ll set it up with phpMyAdmin for managing the database, and we’ll configure Git along with an upstream origin on GitHub so that we can develop and test our code, and then push it up to production.
You can install the required software via the Discover Software Centre, or Muon Package Manager or Apt ( instructions below )
You’ll be installing the following to your main system, and then using Virtualbox to run Ubuntu Server in a Virtual Machine.
- Virtualbox
- Java ( via OpenJDK-9)
- Eclipse PDT
Then you will be using Virtualbox to run Ubuntu Server in a Virtual Machine.
Manual pages are your friend
Linux and Unix command shells all come with a built in manual, and indeed commands themselves come with built in help. For all of the various commands that we will be using below, I encourage you to try putting man infront of them to get a run down on what they do
man
For even more fun try man man, to retrieve the manual page about the manual program, pretty neat.
Install Virtualbox, Java and Eclipse
sudo apt install virtualbox virtualbox-guest-additions-iso virtualbox-qt virtualbox-ext-pack
sudo apt openjdk-9-jdk openjdk-9-jre
Install Eclipse PHP for PHP Developers.
Download and architecture suitable tarball from eclipse.org and copy the tarball to the /opt directory on your system. This is usually downloaded as a .tar.gz ( a Gzipped Tarball )
Unzip the .gz package using gunzip ( man gunzip )
man gunzip = access the manual pages for the gunzip command
Next unpack the tarball using the tar ( man tar )
man tar = access the manual pages for the tar command
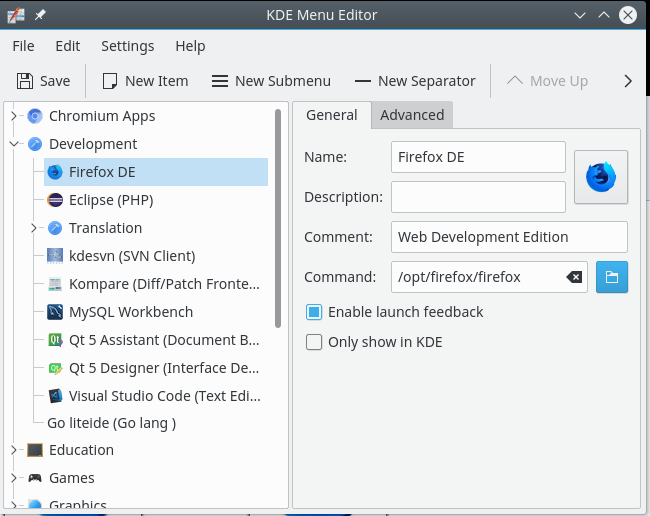
I usually unpack/install Eclipse in /opt on Linux and on Kubuntu I use the kmenuedit command to add an entry for Eclipse to the Developer menu.
This will give you an eclipse executable and an icon.xpm (for your menu entry, in kmenuedit) in /opt/ Set your command in kmenuedit to /opt/eclipse/eclipse you’re done.
Spin up a Virtualbox VM and install Ubuntu Server
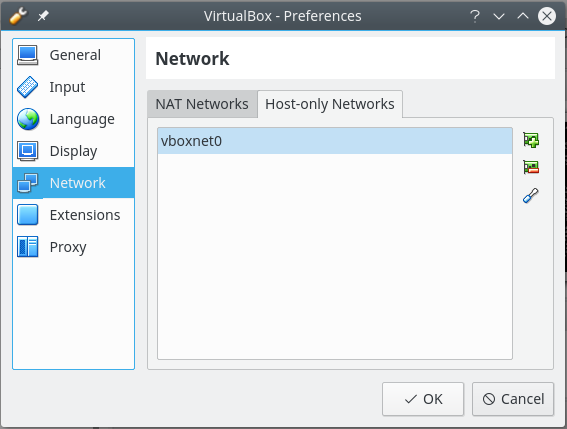
You’ll need to configure a Host-Only Adapter in VirtualBox, do this via the
File -> Preference -> Network-> Host-Only-Network
Download Ubuntu Server ( I’m using 16.04 LTS, but feel free to run with 17.10 or the latest if you prefer ), you can download from either :-
Ubuntu Server - Download from Canonical
Ubuntu Server - using a Torrent
Personanlly I prefer to use a torrent where possible. Ktorrent comes installed as standard in Kubuntu, you can open Ktorrent and simply drag the link from the webpage onto the Ktorrent application and it will take care of the rest.
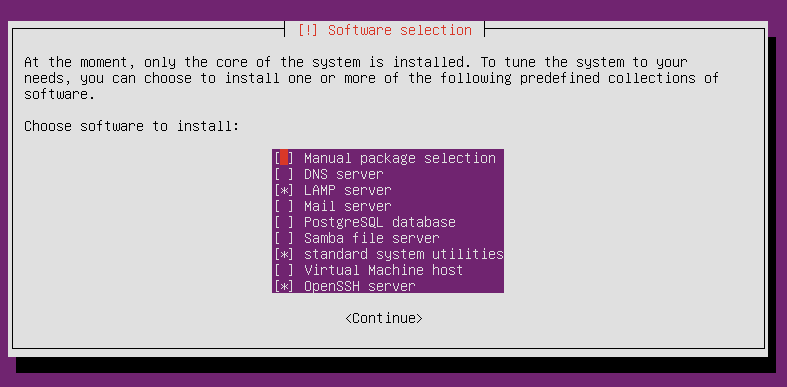
Install Ubuntu Server onto Virtualbox, here is a very useful guide
When you reach the software selection part of the installation, you should choose LAMP, Standard System Utilitis, and OpenSSH Server
Once you’ve installed, rebooted and your server is up and running. Login and run
ifconfig
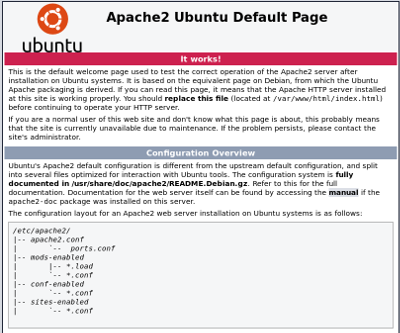
This will tell you what the IP address is of your server, it will be something like 192.168.56.101.
Now from your main machine open a browser and point it to the IP address obtained above. This should get you something looking like this
Adding a second network for internet
Now that your virtual development server is up, and you can connect to the default Apache page. The next step is to enable your server to also reach the internet. This will provide you access to software updates and give the ability to install extra packages.
First, shutdown the server, and go to it’s settings in Virtualbox, click on the Networks tab, and select Adapter 2. Enable this interface and set it to NAT and boot it back up.
Next we need to configure this secondary interface. First lets find out the name that has been assigned
ifconfig -a
This will provide you a list of all the interfaces. There should be 3, 1 with an IP, the other without and a lo interface ( the local interface ) We can configure this second interface by editing it’s configuration
sudo nano -w /etc/network/interfaces
In this configuration file you see an entry for the first interface that reads something similar to this
The primary netowrk interface auto enp0s3 iface enp0s3 inet dhcp
Add an additional set of lines for your secondary interface similar to this ( of course use the name discovered by ifconfig -a above )
Secondary NAT interface for internet auto enp0s8 iface enp0s8 inet dhcp
Reboot you virtual server. Once it comes back up, take a look at the network interfaces using
ifconfig
This time you should see 3 interfaces and both the enp0sX interfaces have ip addresses.
Installing php-xdebug onto the server
sudo apt-get install php-xdebug
This should take care of configuring a basic installation, but we’re going to need to do better than that. We need to enable our virtual server to call back to our main machine with debug information. Additionally, because we want this to work irrespective of what DHCP network IP address gets set by Virtualbox. Also we’ll need to provide a calling back port that Eclipse will listen on for debug information. The xdebug website has great documentation on how to configure the debugger in this way
Xdebug configuration documentation
PHP has two configuration sections, one applied to apache and the other applied to the command line ( cli ) this are located in
/etc/php/7.0/
We need to apply some extra configuration parameters to our apache xdebug.ini configuration. You’ll find that at
/etc/php/7.0/apache2/20-xdebug.ini
Edit that file to look like this
zend_extension=xdebug.so
xdebug.remote_enable=on
xdebug.remote_handler=dbgp
xdebug.remote_mode=req
xdebug.remote_connect_back=1
xdebug.remote_port=9000
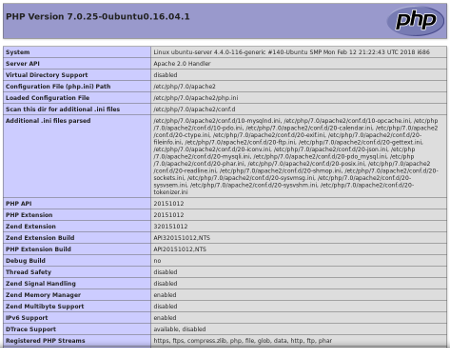
Testing your PHP installation
OK, lets test what we have got so far. Create a file called phpinfo.php on your virtual server in /var/www/html/ and edited it to look like this
phpinfo();?>
Then from your main machine point your browser to your virtual machines IP address like this
192.168.56.101/phpinfo.php
You should see something like this :-
Remote mounting of the Server using sshfs
Being able to use your local Eclipse IDE to work on the files on the remote server is very convenient. We’ll setup some pre-shared ssh keys, configure an SSHFS mount of the servers file system, and setup a command alias for easy access.
If you don’t already have SSH keys for your user, you can generate a set with the command
ssh-keygen
Next we want to copy those SSH keys as identify keys for the user on your virtual server, do this with
ssh-copy-id username@ip.of.your.server
You’ll be promtped for the user password of the virtual server, and then your SSH keys will be copied across. After this you won’t need a password to login to your virtual ubuntu server.
We need to add your user on the virtual server to the www-data group ( this is the user and group responsible for running the webserver ) so that you can read, and write files that the apache2 webserver uses. In addition we will move the /var/www/html directory into your users home directory making it easy to access the webservers files, and create a symbolic link for the webserver to follow.
Login to the virtual server, and execute the following commands
sudo usermod -aG www-data your_username
Move the files for the webserver to your users home directory, and symlink them back
mkdir ~/html cp /var/www/html/* ./html/ cd /var/www/html sudo mv ./html ./html_achived sudo ln -s /home/<username/html ./html
Now, we can set up a SSHFS command to mount the virtual servers file system onto our main machine for easy access to our working files.
sshfs username@ubuntu-server: ~/Ubuntu-Server -o nonempty
The knack to doing this is to create a special command for doing it. You do this by adding an alias entry into your .bashrc file. Open your bashrc file as follows :-
nano -w ~/.bashrc
Now you can add a couple of lines, at the bottom of that file, similar to those below :->
#Various command aliases
alias mount.ubuntu = sshfs ricktimmis@192.168.56.101: ./Ubuntu-Server -o nonempty
Installing Git and Git-flow
These tools help you manage your code source files. Git makes working with others simple, but more importantly it allows you to iterate changes in your code and always be able to step back to a previously known good state. I have included git-flow as it adds branching strategy into your workflow, which saves you time and ensures that your branching is always consitent. As always the man pages are your friend, but I also recommend reading the git book written by Scott Chacon and Ben Straub and published by Apress. You can also read the git-book online
Git is probably already installed on your Ubuntu Server, but just in case, this command will take care of installing both Git and Git-Flow
sudo apt-get install git git-flow
Next, you can clone my simple tools for testing and setting up your Eclipse debug tool chain. Change directory to the html directory, and clone my repo.
cd ~/Ubuntu-Server/html
git clone git@github.com:ricktimmis/dev-php-eclipse.git
You’ll notice that now you can do this either directly from your virtual server, or from the Ubuntu-Server directory on your main machine and the results will be the same. That’s the magic of SSHFS, pretty neat !
Installing Firefox Developer Edition
Full of cool tools, and extension to help you with developing for the open web. We’ll be configuring Eclipse to use Firefox development edition as the run time and debug browser. Rather than the standard browser on your system.
Download Firefox Developer Edition
Once downloaded we’ll install Firefox Development in /opt just like we did for eclipse. It’s a bz2 file so we’ll need the bunzip2 command to unpack it.
bunzip2 firefox-59.0b14.tar.bz2
tar -xvf firefox-59.0b14.tar.bz2
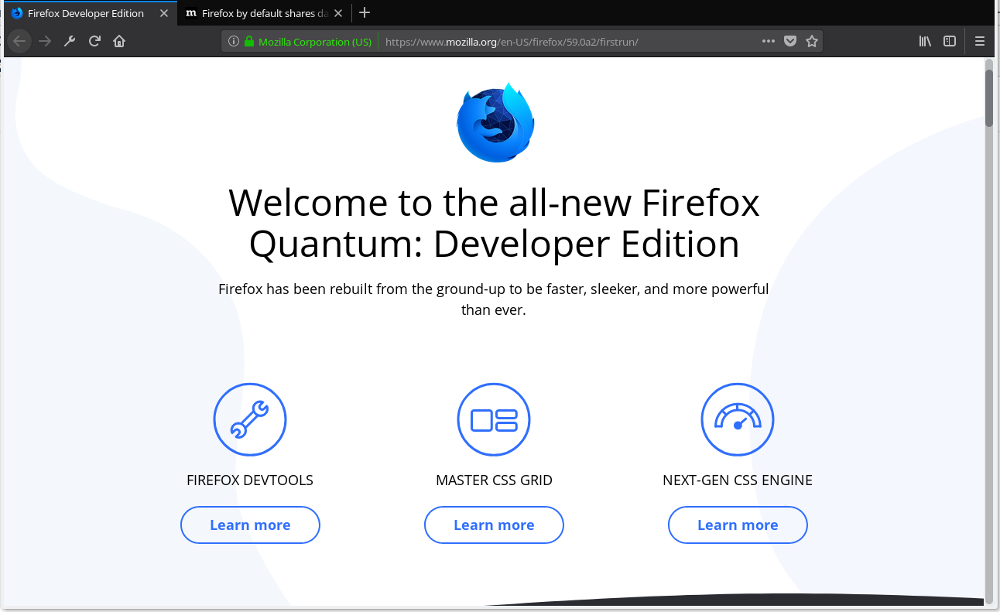
Use kmenuedit to add Firefox to your development menu.
Once installed you should be able to launch Firefox DE from your development menu. We’ll be using this edition as our default browser for Eclipse Run and Debug configurations.
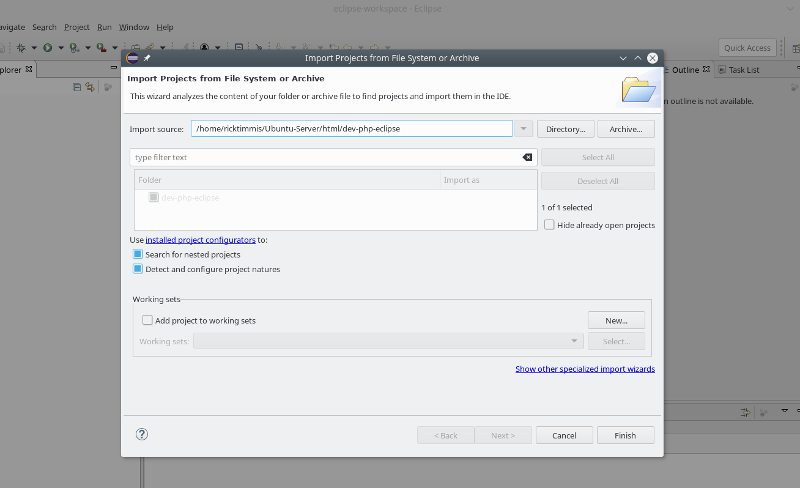
Setting up Eclipse to work with your project
Launch Eclipse, you can close the Welcome page. Goto File -> Open project from file system. Using the import wizard navigate to the ~/Ubuntu-Server/html/dev-php-eclipse directory then click Finish. Eclipse will import your project.
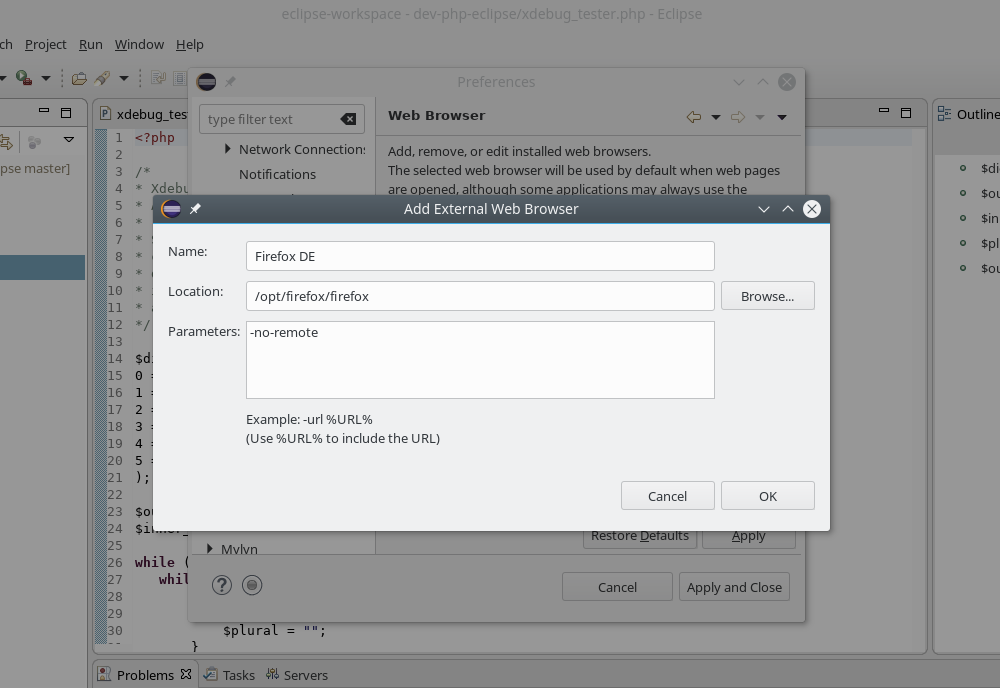
Configure Eclipse to use our Firefox Developer Edition by default. To do this go to Window -> Preferences -> General -> Web Browser
You’ll need to add a new entry for Firefox DE, and we use the -no-remote option, as the Firefox man page reports
Don’t connect to any other running instances of firefox. Use this if you want to run firefox in an entirely new process. By default, firefox will delegate a command to an already running instance.
With the browser setup wer’re now ready to configure our Run Configuration. This tells eclipse where the files are that it will be working with, and where there server is that’ll be serving them. Hopefully, this is all starting to make some sense now and you can see that by making the files locally available via SSHFS, and having the Virtual Ubuntu Server we have created a real world implementation where the server is seperate from the code. You’ll see shortly what a huge advantage this is when we get to the debug configuration shortly.
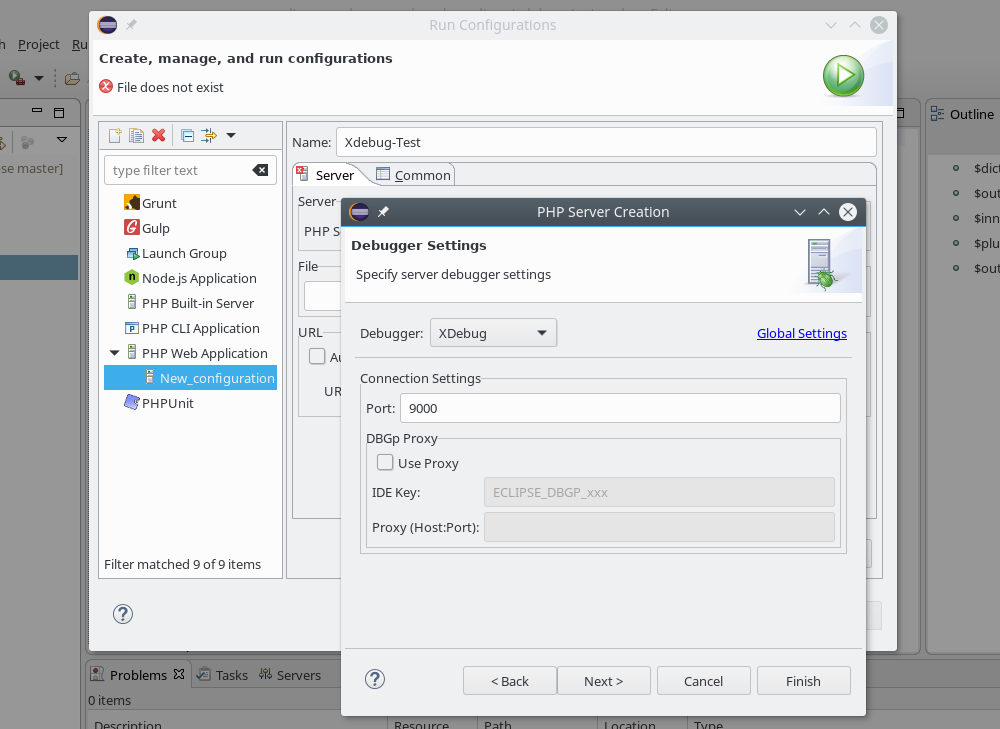
In the interim configure you Run configuration ( The Green Play button ) similar to this.
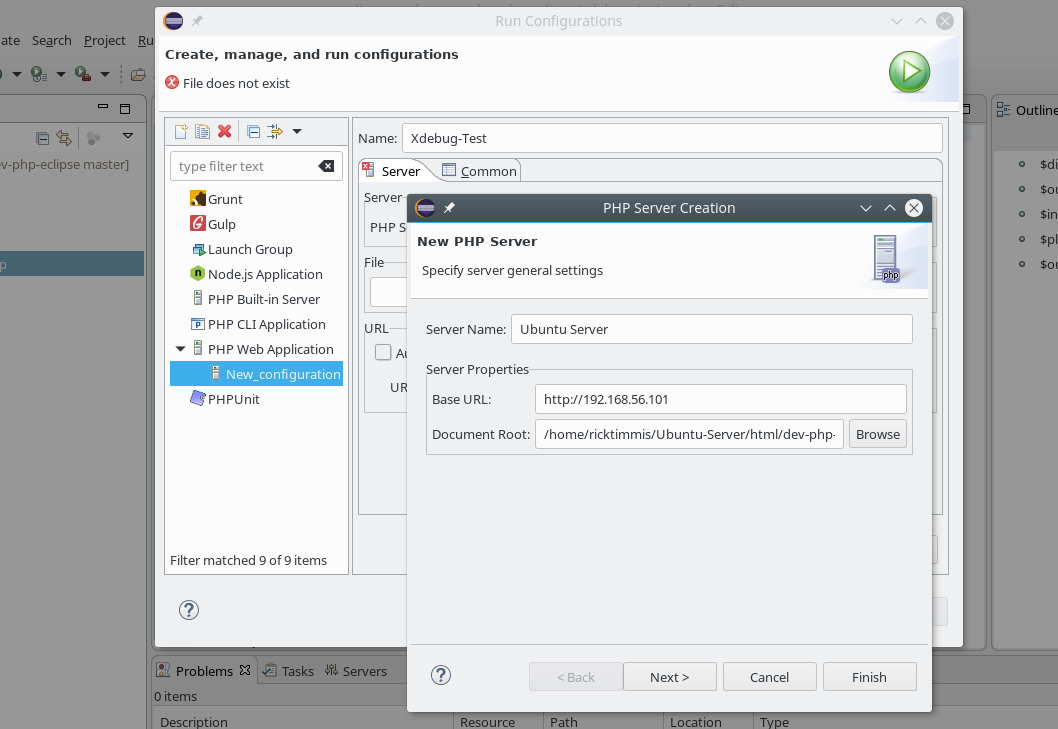
Then click Next ( not Finish) this will take you to the Debug configuration, choose xdebug from the dropdown, click next and configure as shown below.